Archives

Pinterest Picks–Christmas Edition

Christmas is almost here!  I’ve found some really cute last-minute decorating ideas on Pinterest.

Christmas Tree Napkin

A few weeks ago, I wrote a post about napkin folding.  This Christmas tree napkin looks really easy, and the link has detailed instructions.

Christmas Chandelier

If you have a small table, and don’t want to devote precious food space to decorations, hang some ornaments from a light fixture.  The blog in the link has a bunch of other good ideas too.

Mason Jar Candles

To make a snowy mason jar candle, fill the jar part way with salt before adding a votive or tea light.  Follow the link for some nice shabby chic ideas.

Curtain Accents

I don’t usually decorate the bathroom for Christmas, but hanging ornaments from the curtain hooks is clever.  I would probably hang them from the curtain rods over my windows. Follow the link for more bathroom ideas.

Candy Cane Candlestick

If you’re like me, you have plenty of jar candles but no nice candlesticks for a dinner table.  It’s not clear how easily you can eat the candy canes when you’re done, but it’s probably just a matter or peeling off some hot glue.  The instructions in the link say you need 20 candy canes for two candles.

Merry Christmas and happy crafting!

How to Dress Up a Gift Card

Gift cards make great last-minute gifts and stocking stuffers, and most stores sell decorative holders.  But I think it makes a gift card look more special to make your own holder.  Here’s how to make a no-sew gift card holder for only a few cents.

Santa

Materials

Felt

Hot glue

Freezer paper

Iron

Puffy fabric paint (if desired)


Step 1

Cut out two pieces of felt that are a little bigger than the gift card.  You could also cut one piece and fold it over, but I like the look of two pieces.  The best way to do this is to sketch your pieces on the papery side of freezer paper.  Then iron the freezer paper shiny side down onto the felt.  Cut the design out following the sketch on the paper, then peel off the freezer paper.  This should make it easy to see the lines you’ve drawn, as well as make it easier to cut the felt without it stretching or pulling.

I’ve tried other ways of cutting felt in the past, but after trying this method, I’m never doing it any other way.  It was so easy, and worked so perfectly!

Iron On


Step 2

Cut out any additional pieces of felt to make the design of your choice.  The Santa card holder that I made is very simple, with only straight lines to cut, and a bit of fabric paint.Peel Off


Step 3

Hot glue three of the edges of the first two pieces of felt you cut.  My hot glue gun is a low-temp, so I had to work very quickly to be able to put my pieces together before the glue cooled.  I laid my pieces on top of each other, then glued half of each seam at a time.  Make sure you’re able to slide the gift card in and out before moving on.

Step 4

Hot glue the smaller pieces to the holder to make your design.  Be sure not to use too much glue, or stick your fingers in it.  Ouch!

Glue the pieces on

Step 5

If you think your design needs a little sparkle or detail, use the fabric paint to finish the look.


Merry Christmas!

Santa Hat Pattern: Double Crochet

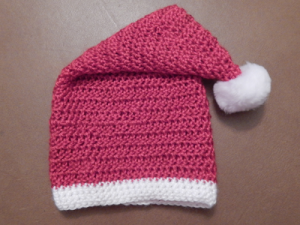
There are a lot of free patterns to knit or single crochet a Santa hat, but I had a hard time finding a double crochet pattern I liked.  So here’s the pattern I created.  I prefer double crochet because I think it’s faster and stretchier than single crochet.  I made this hat for a 4-month-old, but since a Santa hat is basically a cone, and you just have to keep making it bigger to make different sizes, it’s very easy to adapt this pattern for different ages. Just keep repeating the increasing pattern until the opening looks like the right size.

This pattern starts out similarly to any basic double crochet hat, like this one.  The main difference is that while a regular hat increases every round, a Santa hat increases every other round.

Santa Hat

Materials

One skein red yarn

One skein white yarn

Size G hook

White pom pom


Pattern

(With Red) Chain (ch) 4 and use a slip stitch (sl st) to join to the first chain stitch to create a loop.

Row 1:  Ch 3. Double crochet (dc) 5 into the middle of the loop. Join with sl st to the top of the first ch 3 in the row. 6 stitches.

Row 2:  Ch 3. Double crochet into the same stitch (st), dc into the next st. <2 dc into next st, dc in next st> Repeat <> until end of row. Join with sl st to the top of ch 3. 12 stitches.

Row 3:  Ch 3. Double crochet into every stitch. Join with sl st to the top of ch 3. 12 stitches.

Row 4:  Ch 3. Double crochet into the same st, dc into the next 2 st. <2 dc into next st, dc in next 2 st> Repeat <> until end of row. Join with sl st to the top of ch 3. 18 stitches.

Row 5:  Ch 3. Double crochet into every stitch. Join with sl st to the top of ch 3. 18 stitches.

Row 6:  Ch 3. Double crochet into the same st, dc into the next 3 st. <2 dc into next st, dc in next 3 st> Repeat <> until end of row. Join with sl st to the top of ch 3. 24 stitches.

Row 7:  Ch 3. Double crochet into every stitch. Join with sl st to the top of ch 3. 24 stitches.

Row 8:  Ch 3. Double crochet into the same st, dc into the next 4 st. <2 dc into next st, dc in next 4 st> Repeat <> until end of row. Join with sl st to the top of ch 3. 30 stitches.

Row 9:  Ch 3. Double crochet into every stitch. Join with sl st to the top of ch 3. 30 stitches.

Row 10:  Ch 3. Double crochet into the same st, dc into the next 5 st. <2 dc into next st, dc in next 5 st> Repeat <> until end of row. Join with sl st to the top of ch 3. 36 stitches.

Row 11:  Ch 3. Double crochet into every stitch. Join with sl st to the top of ch 3. 36 stitches.

Row 12:  Ch 3. Double crochet into the same st, dc into the next 6 st. <2 dc into next st, dc in next 6 st> Repeat <> until end of row. Join with sl st to the top of ch 3. 42 stitches.

Row 13:  Ch 3. Double crochet into every stitch. Join with sl st to the top of ch 3. 42 stitches.

Row 14:  Ch 3. Double crochet into the same st, dc into the next 7 st. <2 dc into next st, dc in next 7 st> Repeat <> until end of row. Join with sl st to the top of ch 3. 48 stitches.

Row 15-25:  Ch 3. Double crochet in each st around.  Join with sl st to the top of ch 3. 48 stitches.

Row 26-27:  (With White) Ch 2. Half double crochet into every stitch. Join with sl st to the top of ch 2. 48 stitches.

Finish off, weave in the ends, and sew a white pom-pom to the tip.


What’s Next?

More Christmas crafts!